sudo mount -t smbfs //192.168.1.2/Video ~/video -o credentials=/etc/samba/cred-file,uid=ronadams,gid=users
that's the way, use command to mount samba folder
record my way to ubuntu
sudo mount -t smbfs //192.168.1.2/Video ~/video -o credentials=/etc/samba/cred-file,uid=ronadams,gid=users
add my code hier
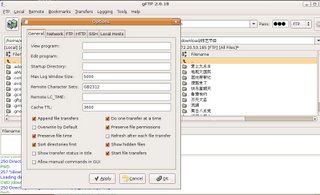
tar -jxvf gftp-2.0.18.tar.bz2注意安装之前,要去源里面,把libgtk2.0的包全给装上,否则configure时会出错。安装补完的gFTP源码:
patch -p0 < gftp_remote_charsets.patch
cd gftp-2.0.18运行gFTP,将Remote Character Sets设成GB2312,这样就行了。
./configure
make
make install

apt-get install alien用后用alien安装那个rpm包:
alien -i d4x-2.5.7.1-1.i386.rpm装完了发现不好用,找不到ssl。这里是缺少libssl,因为openssl是缺省安装的。上源,拉下libssl0.9.8,libssl0.9.8-dbg和libssl-dev。可还是不行,在terminal里面输入d4x出来这样的错误提示:
nt但是在d4x源文件目录下面configure是可以的(如果不装前面三个libssl提示找不到openssl),于是决定从源文件里面装。
nt: error while loading shared libraries: libssl.so.6: cannot open shared object file: No such file or directory
apt-get install build-essential安装kernel header
apt-get install linux-headers-`uname -r`4.6版本的Cisco需要打一下补丁。
xin@ubuntu:~/cisco/vpnclient$ sudo ./vpn_install将Profile dul.pcf拷贝到/etc/opt/cisco-vpnclient/Profiles/下面。最后连接一下试试看。
Cisco Systems VPN Client Version 4.8.00 (0490) Linux Installer
Copyright (C) 1998-2005 Cisco Systems, Inc. All Rights Reserved.
By installing this product you agree that you have read the
license.txt file (The VPN Client license) and will comply with
its terms.
Directory where binaries will be installed [/usr/local/bin]
Automatically start the VPN service at boot time [yes]
In order to build the VPN kernel module, you must have the
kernel headers for the version of the kernel you are running.
Directory containing linux kernel source code [/lib/modules/2.6.15-23-686/build]
* Binaries will be installed in "/usr/local/bin".
* Modules will be installed in "/lib/modules/2.6.15-23-686/CiscoVPN".
* The VPN service will be started AUTOMATICALLY at boot time.
* Kernel source from "/lib/modules/2.6.15-23-686/build" will be used to build the module.
Is the above correct [y]
Making module
make -C /lib/modules/2.6.15-23-686/build SUBDIRS=/home/alan/cisco/vpnclient modules
make[1]: Entering directory `/usr/src/linux-headers-2.6.15-23-686'
Building modules, stage 2.
MODPOST
Warning: could not find /home/alan/cisco/vpnclient/.libdriver.so.cmd for /home/alan/cisco/vpnclient/li bdriver.so
make[1]: Leaving directory `/usr/src/linux-headers-2.6.15-23-686'
Create module directory "/lib/modules/2.6.15-23-686/CiscoVPN".
Copying module to directory "/lib/modules/2.6.15-23-686/CiscoVPN".
Already have group 'bin'
Creating start/stop script "/etc/init.d/vpnclient_init".
/etc/init.d/vpnclient_init
Enabling start/stop script for run level 3,4 and 5.
Creating global config /etc/opt/cisco-vpnclient
Installing license.txt (VPN Client license) in "/opt/cisco-vpnclient/":
Installing bundled user profiles in "/etc/opt/cisco-vpnclient/Profiles/":
* New Profiles : sample
Copying binaries to directory "/opt/cisco-vpnclient/bin".
Adding symlinks to "/usr/local/bin".
/opt/cisco-vpnclient/bin/vpnclient
/opt/cisco-vpnclient/bin/cisco_cert_mgr
/opt/cisco-vpnclient/bin/ipseclog
Copying setuid binaries to directory "/opt/cisco-vpnclient/bin".
/opt/cisco-vpnclient/bin/cvpnd
Copying libraries to directory "/opt/cisco-vpnclient/lib".
/opt/cisco-vpnclient/lib/libvpnapi.so
Copying header files to directory "/opt/cisco-vpnclient/include".
/opt/cisco-vpnclient/include/vpnapi.h
Setting permissions.
/opt/cisco-vpnclient/bin/cvpnd (setuid root)
/opt/cisco-vpnclient (group bin readable)
/etc/opt/cisco-vpnclient (group bin readable)
/etc/opt/cisco-vpnclient/Profiles (group bin readable)
/etc/opt/cisco-vpnclient/Certificates (group bin readable)
* You may wish to change these permissions to restrict access to root.
* You must run "/etc/init.d/vpnclient_init start" before using the client.
* This script will be run AUTOMATICALLY every time you reboot your computer.
sudo /etc/init.d/vpnclient_init start为了每次不用root权限来运行vpnclient,修改一下访问权限。
sudo vpnclient connect dul
chmod 4111 /opt/cisco-vpnclient/bin/cvpnd然后把"/etc/init.d/vpnclient_init start"写到启动程序里面,那样的话,不需要root也能连接vpn了。
root@ubuntu:/opt/RealPlayer# ./realplay为解决冲突,需要修改/opt/Realplayer/realplay文件(文件具体目录看你装在哪里了)。在#!/bin/sh后面加入
./realplay: line 75: 9774 Segmentation fault $REALPLAYBIN "$@"
export GTK_IM_MODULE=xim然后存盘,再运行realplay就好了。

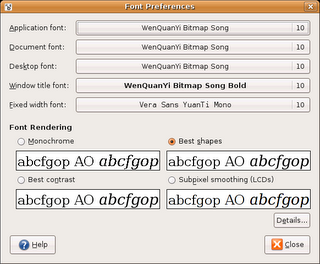
<!-- Use Bitstream Vera Sans in Chinese Font -->有了以上代码,系统在使用文泉驿字体时,遇到英语字母会自动调用Bitstream Vera Sans字体。效果如图所示,同时使用文泉驿和Bitstream Vera Sans字体:
<match target="pattern" >
<test compare="eq" name="family" qual="any" >
<string>WenQuanYi Bitmap Song</string>
</test>
<edit mode="prepend_first" binding="strong" name="family" >
<string>Bitstream Vera Sans</string>
</edit>
</match>


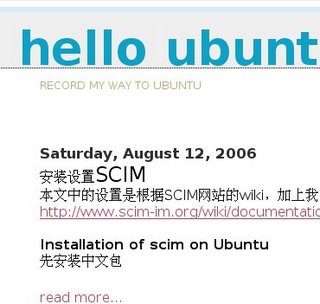
<?xml version="1.0"?>可惜文泉驿没有大字体,显示我的Blog文章的标题就不能用大字体显示,看图吧:
<!DOCTYPE fontconfig SYSTEM "fonts.dtd">
<!-- /etc/fonts/local.conf file for local customizations -->
<fontconfig><!-- Serif faces -->
<alias>
<family>DejaVu Serif</family>
<family>Bitstream Vera Serif</family>
<family>Times New Roman</family>
<family>Thorndale AMT</family>
<family>Times</family>
<family>Nimbus Roman No9 L</family>
<family>Luxi Serif</family>
<family>Kochi Mincho</family>
<family>WenQuanYi Bitmap Song</family>
<family>AR PL New Sung</family>
<family>Vera Sans YuanTi</family>
<family>AR PL SungtiL GB</family>
<family>AR PL Mingti2L Big5</family>
<family>MS 明朝</family>
<family>Baekmuk Batang</family>
<family>FreeSerif</family>
<family>MgOpen Canonica</family>
<default><family>serif</family></default>
</alias>
<!-- Sans-serif faces -->
<alias>
<family>DejaVu Sans</family>
<family>Bitstream Vera Sans</family>
<family>Helvetica</family>
<family>Arial</family>
<family>Verdana</family>
<family>Albany AMT</family>
<family>Nimbus Sans L</family>
<family>Luxi Sans</family>
<family>Kochi Gothic</family>
<family>WenQuanYi Bitmap Song</family>
<family>AR PL New Sung</family>
<family>Vera Sans YuanTi</family>
<family>AR PL KaitiM GB</family>
<family>AR PL KaitiM Big5</family>
<family>MS ゴシック</family>
<family>Baekmuk Dotum</family>
<family>SimSun</family>
<family>FreeSans</family>
<family>MgOpen Moderna</family>
<default><family>sans-serif</family></default>
</alias>
<!-- Monospace faces -->
<alias>
<family>DejaVu Sans Mono</family>
<family>Bitstream Vera Sans Mono</family>
<family>Courier</family>
<family>Courier New</family>
<family>Andale Mono</family>
<family>Luxi Mono</family>
<family>Cumberland AMT</family>
<family>Nimbus Mono L</family>
<family>Vera Sans YuanTi Mono</family>
<family>WenQuanYi Bitmap Song</family>
<family>AR PL New Sung</family>
<family>NSimSun</family>
<family>FreeMono</family>
<default><family>monospace</family></default>
</alias>
<!-- Use Bitstream Vera Sans in Chinese Font -->
<match target="pattern" >
<test compare="eq" name="family" qual="any" >
<string>WenQuanYi Bitmap Song</string>
</test>
<edit mode="prepend_first" binding="strong" name="family" >
<string>Bitstream Vera Sans</string>
</edit>
</match>
<!-- Disable font alias for Chinese <= 16px -->
<match target="font">
<test qual="any" name="family" compare="eq">
<string>WenQuanYi Bitmap Song</string>
<string>Vera Sans YuanTi</string>
<string>AR PL New Sung</string>
<string>AR PL Mingti2L Big5</string>
<string>AR PL SungtiL GB</string>
<string>MS 明朝</string>
<string>Kochi Mincho</string>
<string>Baekmuk Batang</string>
</test>
<test name="pixelsize" compare="less_eq">
<double>16</double>
</test>
<edit name="antialias">
<bool>false</bool>
</edit>
<edit name="hinting">
<bool>false</bool>
</edit>
</match>
</fontconfig>

fc-cache -f -v然后将FontPath "/usr/share/fonts/truetype/ttf-vera-sans-yuanti"加入/etc/X11/xorg.conf,就和文泉驿字体一样。
tar -zxvf wqy-bitmapfont-pcf-0.7.0-4.tar.gz在xorg.conf中加入文泉驿字体的路径"/usr/share/fonts/bitmap/wenquanyi":
cd wqy-bitmapfont
mkdir -p //usr/share/fonts/bitmap/wenquanyi
cp *.pcf //usr/share/fonts/bitmap/wenquanyi
fc-cache -f -v
cd /usr/share/fonts/bitmap/wenquanyi
mkfontdir
cp fonts.dir fonts.scale
gedit /etc/X11/xorg.conf
......接下去要unlink掉一个/etc/fonts/conf.d下的文件,否则字体不会被调用。
Section "Files"
......
FontPath "/usr/share/X11/fonts/100dpi"
FontPath "/usr/share/X11/fonts/75dpi"
FontPath "/usr/share/fonts/bitmap/wenquanyi"
......
cd /etc/fonts/conf.d/最后重启X或系统。就能在System->Performaces->Font下面看到WenQuanYi Bitmap Song的字体了。然后在Firefox中也选择文泉驿字体。
unlink 30-debconf-no-bitmaps.conf
sudo apt-get install language-pack-zhMake sure you have the universe repository enabled.
sudo apt-get install scim-gtk2-immoduleThen install the input method engines you plan to use.
sudo apt-get install scim-pinyinSystem configuration
export XMODIFIERS="@im=SCIM"It is useless to export QT_IM_MODULE="scim" because the Qt-immodule patch is not applied in Ubuntu's Qt. Therefore, scim (or skim) interacts with KDE/Qt apps via XIM protocol.
export GTK_IM_MODULE="scim"
export XIM_PROGRAM="scim -d"
sudo dpkg-reconfigure localesSelect the locale you have chosen as default, it may be already.
LANG=en_US.UTF-8Where en_US.UTF-8 is to replace with the locale you have chosen.
LC_CTYPE=en_US.UTF-8
**切记,这里不能是utf8
mkdir ~/.scimwhere fr_FR.UTF-8 is your locale.
echo '/SupportedUnicodeLocales = en_US.UTF-8,fr_FR.UTF-8' > ~/.scim/global
scim -dYou can keep the order at 50.
network.dns.disableIPv6: true
network.http.max-connections-per-server: 24
network.http.pipelining: true
network.http.pipelining.maxrequests: 8
network.http.proxy.pipelining: true
nglayout.initialpaint.delay: 0
sudo apt-get install linux-686就会把686的kernel给装上了。当然这里需要联网。装完之后重启,在terminal输入
uname -a查看,发现kernel是686的了。在下面这篇东西所引用的链接里面,可以知道386的kernel和686的kernel有什么区别。